

This is a story of my search for a way to make nice little polymer clay frames to put photos into for a bracelet or pendant to create keepsake jewelry. My first attempt to do this was a couple years ago when I made my Fisherwomen Bracelet. My aunt had recently passed away, and I was looking over old family photos when I noticed many of my female relatives had enjoyed catching fish. I found photos of my mom, my grandma, a cousin and me holding up our catches for the camera. I made this bracelet as a way to work through the grief of missing my mom and aunt and grandma...
 |
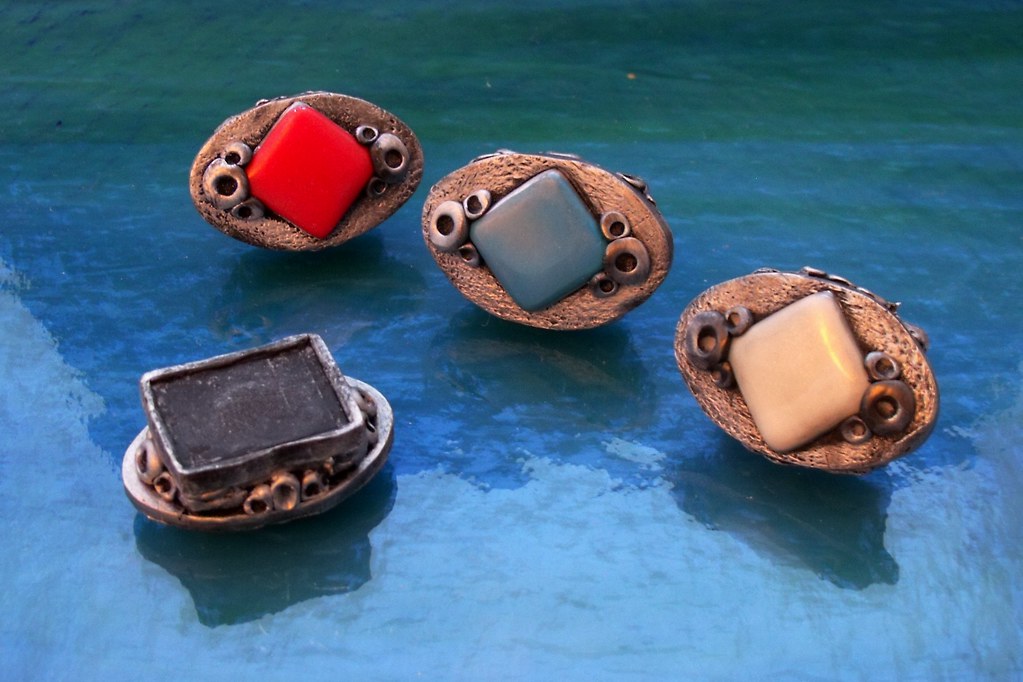
| I was totally a novice at polymer clay, and you can see that my "frames" were sloppy at best. When my neighbor asked me to make some jewelry to match her grandma's ring, (Please see my previous blog for more on her story.)I knew I wanted to find a way to do something similar to my Fisherwomen bracelet, but I needed to find a way to clean up the look. Here is a quick tutorial of how I worked out a solution.  Step #1 - My first step was to resize the photos that my neighbor wanted in her jewelry. I cropped them and made them the same height and width. This is easily done in Word by setting the margins to whatever width you prefer, pasting the photos into your document, selecting them and then pulling the corner of the photo to match the margins. These photos were all about ¾" x ½ " rectangles. I printed out some draft copies of the photos on regular paper to use during the bead making process (uncured clay touching the photos will leach into them), and cut them out. Then, I rolled out a very thin strip of black clay and smoothed it to a slightly textured tile. I then placed the photos along the edge of the strip of clay. Step #1 - My first step was to resize the photos that my neighbor wanted in her jewelry. I cropped them and made them the same height and width. This is easily done in Word by setting the margins to whatever width you prefer, pasting the photos into your document, selecting them and then pulling the corner of the photo to match the margins. These photos were all about ¾" x ½ " rectangles. I printed out some draft copies of the photos on regular paper to use during the bead making process (uncured clay touching the photos will leach into them), and cut them out. Then, I rolled out a very thin strip of black clay and smoothed it to a slightly textured tile. I then placed the photos along the edge of the strip of clay.  Step #2 - I used a straight edge to measure and cut the opposite edge of the clay allowing for about 1/16" extra space on either side of the widest photo. Step #2 - I used a straight edge to measure and cut the opposite edge of the clay allowing for about 1/16" extra space on either side of the widest photo.  Step #3 - After removing the long excess strip of clay from the opposite side in step #2, I also cut the left and right sides of clay on either side of each photo and removed the clay in between. I made sure to leave just a bit of uncovered clay (1/16") on either side of each photo and also tried to make sure that each of the clay pieces was cut to a uniform size. Step #3 - After removing the long excess strip of clay from the opposite side in step #2, I also cut the left and right sides of clay on either side of each photo and removed the clay in between. I made sure to leave just a bit of uncovered clay (1/16") on either side of each photo and also tried to make sure that each of the clay pieces was cut to a uniform size.  Step #4 - Now, I removed the paper photos and put the rectangles in the oven for about 10 minutes, just enough time to firm up the clay a bit. I allowed these to cool but left them secured to the tile and used a straight edge to mark a 1/8" border around each clay rectangle with a permanent felt-tip pen (Sharpie). I then brushed a generous coating of Donna Kato's Repel Gel on each of the semi-cured clay pieces trying to be careful to leave them secured to the tile. (I don't know how I'd cope with claying without this great product that allows me to bake clay together without it sticking together.) Step #4 - Now, I removed the paper photos and put the rectangles in the oven for about 10 minutes, just enough time to firm up the clay a bit. I allowed these to cool but left them secured to the tile and used a straight edge to mark a 1/8" border around each clay rectangle with a permanent felt-tip pen (Sharpie). I then brushed a generous coating of Donna Kato's Repel Gel on each of the semi-cured clay pieces trying to be careful to leave them secured to the tile. (I don't know how I'd cope with claying without this great product that allows me to bake clay together without it sticking together.) Step #5 - I then rolled out a thick strip of uncured clay and covered the rectangles, using my smoothing tools to make sure the uncured clay was touching the tile and all snuggled around the thin cured rectangles. If I noticed any air pockets I pierced them with the tip of a knife and then smoothed the clay down again. Step #5 - I then rolled out a thick strip of uncured clay and covered the rectangles, using my smoothing tools to make sure the uncured clay was touching the tile and all snuggled around the thin cured rectangles. If I noticed any air pockets I pierced them with the tip of a knife and then smoothed the clay down again.  Step #6 - When all the clay was secured around the rectangles and to the tile, I leveled it and used my marked lines to cut out the individual "frames." Then I textured the tops and baked them for about a third of the time suggested by the package. I've made a texturing tool like the ones in one of my favorite polymer clay books, Enchanted Adornments by Cynthia Thornton. The texturing gives the backs of the frames some "tooth" to let the uncured clay added in a later step adhere well. If you don't have a texturing tool you could use some rough sandpaper instead, but if you can get your hands on Cythia's book I'm sure you would love it. It is simply enchanting as the title suggests. Step #6 - When all the clay was secured around the rectangles and to the tile, I leveled it and used my marked lines to cut out the individual "frames." Then I textured the tops and baked them for about a third of the time suggested by the package. I've made a texturing tool like the ones in one of my favorite polymer clay books, Enchanted Adornments by Cynthia Thornton. The texturing gives the backs of the frames some "tooth" to let the uncured clay added in a later step adhere well. If you don't have a texturing tool you could use some rough sandpaper instead, but if you can get your hands on Cythia's book I'm sure you would love it. It is simply enchanting as the title suggests.  Step #7 - After curing, I allowed the items to cool and then carefully removed the thin rectangles from the frames. You can see that even with my measuring, these are not so uniform, so I decided to carve down the edges to make the frames look much neater. (I used a paring knife to do this, removing little slices at a time from each long edge in turn, sort of like peeling a cucumber.) I also sanded down the rough corners and edges a bit. Step #7 - After curing, I allowed the items to cool and then carefully removed the thin rectangles from the frames. You can see that even with my measuring, these are not so uniform, so I decided to carve down the edges to make the frames look much neater. (I used a paring knife to do this, removing little slices at a time from each long edge in turn, sort of like peeling a cucumber.) I also sanded down the rough corners and edges a bit. This photo shows the results after I carved and sanded the little frames.   Step #8 - On the backs of the frames I added some strips of uncured clay and made channels for stringing with glass beads. I like to do this to be sure the clay beads do not break when stringing. I then added the decorative tops of the beads that I had already prepared and secured them with liquid clay and little balls of clay. After curing the beads, sanding and buffing them, and then using some Rub-n-Buff on them, I printed out a new set of tiny photos on photo paper. I cut these out, laid them face down on the sticky surface of some clear packing tape, cut off all but a narrow strip of the tape around each photo and attached the photos to the inside of the frames. (Lisa Pavelka's instructions suggested doing this to protect the photos. Please don't use glues or Mod Podge to secure the photos if you plan to use her product. She warns about chemical reactions that can lead to a cloudy appearance or a problem with curing.) I then covered the photos with a generous coating of the Magic Glos. I love this product since it cures in fifteen minutes in sunlight. It is also self leveling and has a glass-like finish when cured - which, in my opinion, is great! I've found that Magic Glos does need edges to push the glos against or it has a tendancy to recede or drip, so my shallow little frames worked well to avoid either of those situations.   Please leave comments if you have any questions about my process. Also, if you try my tutorial, I'd love to see your creations. I'd be happy to add links to your photos for everyone to see and join in the fun. I have a set of photos of this project on my flickr photostream if you would like to see them. Thanks so much for reading my blog! BTW I really do LOVE comments.  |
Oh Jill, that is so amazing. Thanks for the tut, can't wait to try it. I believe that is something in polymer clay even I can do. Very beautiful and love how you presented it.
ReplyDeleteGreat job Jill. What a great idea.. Thanks for sharing with everyone
ReplyDeleteHi Deborah and Alice. Thanks so much for your comments. I'm always hoping that my crazy passion for claying can do some good in the world. By sharing this idea of mine I hope that others will be blessed. I'm sure my neighbor loved her jewelry, and if it helps her cope with the loss of her grandma, then my claying has a purpose. That is why I wanted to give this idea of mine to others so that the blessings can multiply :) Thanks so much for leaving your kind comments!
ReplyDeleteWow, you mean you really measured and didn't just eyeball it? LOL
ReplyDeleteFantastic tutorial Jill...I've added it to my already overflowing list of projects I would like to make!
Hi Barb, yep, I actually measured this time ;). You do know me! Thanks for the comment.
ReplyDeleteThanks Jill, it is wonderfully written and I also have put it with my tutorials that I have!!!!
ReplyDeleteChickeemama
Thanks, Donna :)
ReplyDeleteBravo pour vos créations et courage pour votre "recyclage" forcé ! Hélène
ReplyDeleteT'es si gentille, Hélène :) Merci, et t'as raison, j'aurai besoin de courage! C'est si difficile d'apprendre une nouvelle langue à mon âge pour l'enseigner - je ne peux plus lire les mots minuscules du dictionnaire (comme j'ai pu quand j'avais 15 ans) sans avoir mal à la tête. Heureusement qu'y'a des ordinateurs! :)
ReplyDeleteNice tutorial. Great piece of work. Its beautiful and appreciate your work that how you presented.
ReplyDeleteThanks so much for your comment, Jewelry NJ. I appreciate the time you took to let me know what you thought.
ReplyDeleteUn buen tutorial, bien "Detalles Explicado y MUCHOS contra. Haces ANU Cosas Maravillosas. Besos DESDE Barcelona (España)
ReplyDeleteMuchas gracias y Feliz Navidad, Mª Reyes. Besos desde Indiana à ti tambien.
ReplyDeleteThank you too Jane, Merry Christmas, and yes, it would be an honor to have you tell others about my tutorial.
You have done a great job Jill, I really liked the tutorial, and your art of making Pendants jewelry, you can also decorate with some pearls and gemstone beads. Surely I am gonna to try this. Thanks for the great tutorial.
ReplyDeleteHello, Rambo Fernandis, how nice to find your comment this morning. Thank you very much.
ReplyDeleteI read your post. It's really nice and I like your post. It’s very simple to understand.
ReplyDeleteHere you provide some valuable points about company it's really nice.
Thank you for sharing................
Keepsake jewelry