


Just after the Kobe earthquake in 1995, my high-school students (who were learning Japanese language and culture) wanted to do something to help. We decided to raise money for the victims by selling tickets to a homemade Japanese meal and selling handmade items. Our Japanese teaching assistants, Mayumi Hamano, Atsuko Nishi and Manami Mikami, graciously and patiently taught all of us how to make curry rice and Japanese boxes from milk cartons. I'll leave the curry rice recipe for another time, but in this tutorial I will show you how to make the structure for beautiful Japanese boxes.
Materials:
2(or 3*) clean, empty milk cartons, the same size and the kind made of paper -not plastic
I used two quart sized cartons, but any size will work as long as you have two the same size.
1 pencil (hexagonal, not round)
1 pen
1 ruler
Masking tape
1 pair of scissors
1 bottle of tacky glue
Enough paper or polymer clay to cover the box
Step #1
Measure the height of the milk cartons you are going to use. (They need to be the same size.)
Subtract one inch (2.5 cm) from the total height. Divide the remainder in half. Measure up from the bottom of each of the milk cartons marking this length with your ink pen.
(Example: If your milk carton is nine inches tall, subtract one inch. This leaves eight inches, divided in half that makes four inches. You should measure up four inches on all sides marking a folding or cutting line with your ink pen.
S ee photo #1.
Step #2
From this point we treat each milk carton in a different way. Pick one carton and cut down from the top at each of the four corners just to the line you marked. Try to cut on the exact corner of the carton as much as is possible. Stop cutting this milk carton at the line. When you have cut all four corners it will look like a flower opening its petals.
Put the first milk carton, I'll call it "Petals," aside and focus on the second milk carton.
For this milk carton cut down from the top of each of the four corners all the way to the bottom of the milk carton. On each of these long "flaps" you should also cut on the line you marked in pen in step #1. When you are finished cutting the second carton, you should have four rectangles, two slightly longer than the other two since milk cartons are made that way. This second carton now looks like a "Plus Sign."
See ph oto #2.
Step #3
Place the "petals" milk carton on the center of the "plus sign" milk carton. Pull up the plus sign flaps and use masking tape to fit it snuggly around the petals carton. Use plenty of tape on all the edges of the corners.
See pho to #3.
Step #4
In this step, you will make tubes from the four rectangular pieces that were left over when you cut the "plus sign" in step #2. I like to use a pencil to aid in rolling nice round tubes. I tape the pencil to one narrow end, roll it up tightly, and hold it for a couple seconds to help keep the shape after letting go. When I let go, I unroll the paper, un-tape the pencil leaving the tape at the end of the paper, re-roll with the taped end on the outside now, measure the diameter of each end of the tube making sure they are the same (approx. 1 inch in diameter) and then use the tape to hold it securely at that size. Repeat this rolling, measuring and taping procedure until you have four identical rolls. These will become the supports for the rounded sides of the finished box.
See photo #4.

Step #5
You will use the tubes you made in step #4 to support the shape of your milk carton box. If you like a rounded box, tape the tube in the center of each of the "plus sign" sides.
See pho to #5.
If you like a flare at the top, tape the tube toward the top of each of the "plus sign" sides.
See phot o #6.
o #6.
If you like a flare at the bottom, place the tube at the bottom of each of the "plus sign" sides.
See photo #7.

*If you like a flare at the top and the bottom, use a third milk carton to cut and roll four more tubes (to make a total of eight tubes, one at the top and bottom of each side). Pull in the petal side in the center with tape to make a feminine shaped box.
Pull a petal side down over each of the tube sides and secure the petals at the bottom of the box.
Step #6
Tape, tape, and tape some more.
Use plenty of tape to define whatever shape you choose to make.
When your shape is good and symmetrical on all sides, use tape to cover the openings at each corner. This will give support for the paper or clay you will use to cover the box.
S ee photo #8.
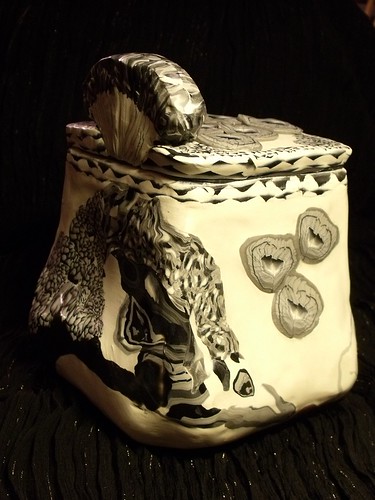
You are now finished making the structure for your Japanese box. Cover it and decorate it as you please to make a Japanese box with your own unique pattern. If you like lids, make a lid to match. I've made lids by covering craft foam or by using polymer clay. Please note, I covered the outside of the clay box with two layers of clay (about a 1/8 inch thick) curing in between the application of layers. I poked a few small holes for air to escape before curing the first layer.
If you choose to leave the inside unpapered, it can be used as a vase since milk cartons are made to hold liquid.
See photos # 9 and 10.


I hope you enjoyed learning to make Japanese boxes. I taught my mother to make these a few years before she passed away. She made the two papered boxes in photos #9 and 10. I treasure the memories we had making beautiful boxes together.
I appreciate my friends, Mayumi, Atsuko, and Manami, for sharing this Japanese craft with us. You helped us earn money to make a nice donation to the Red Cross for the victims of the earthquake, and you taught us skills that have enriched our own lives.
どうもありがとうございました!
Materials:
2(or 3*) clean, empty milk cartons, the same size and the kind made of paper -not plastic
I used two quart sized cartons, but any size will work as long as you have two the same size.
1 pencil (hexagonal, not round)
1 pen
1 ruler
Masking tape
1 pair of scissors
1 bottle of tacky glue
Enough paper or polymer clay to cover the box
Step #1
Measure the height of the milk cartons you are going to use. (They need to be the same size.)
Subtract one inch (2.5 cm) from the total height. Divide the remainder in half. Measure up from the bottom of each of the milk cartons marking this length with your ink pen.
(Example: If your milk carton is nine inches tall, subtract one inch. This leaves eight inches, divided in half that makes four inches. You should measure up four inches on all sides marking a folding or cutting line with your ink pen.
S
 ee photo #1.
Step #2
From this point we treat each milk carton in a different way. Pick one carton and cut down from the top at each of the four corners just to the line you marked. Try to cut on the exact corner of the carton as much as is possible. Stop cutting this milk carton at the line. When you have cut all four corners it will look like a flower opening its petals.
Put the first milk carton, I'll call it "Petals," aside and focus on the second milk carton.
For this milk carton cut down from the top of each of the four corners all the way to the bottom of the milk carton. On each of these long "flaps" you should also cut on the line you marked in pen in step #1. When you are finished cutting the second carton, you should have four rectangles, two slightly longer than the other two since milk cartons are made that way. This second carton now looks like a "Plus Sign."
See ph
 oto #2.
Step #3
Place the "petals" milk carton on the center of the "plus sign" milk carton. Pull up the plus sign flaps and use masking tape to fit it snuggly around the petals carton. Use plenty of tape on all the edges of the corners.
See pho
 to #3.
Step #4
In this step, you will make tubes from the four rectangular pieces that were left over when you cut the "plus sign" in step #2. I like to use a pencil to aid in rolling nice round tubes. I tape the pencil to one narrow end, roll it up tightly, and hold it for a couple seconds to help keep the shape after letting go. When I let go, I unroll the paper, un-tape the pencil leaving the tape at the end of the paper, re-roll with the taped end on the outside now, measure the diameter of each end of the tube making sure they are the same (approx. 1 inch in diameter) and then use the tape to hold it securely at that size. Repeat this rolling, measuring and taping procedure until you have four identical rolls. These will become the supports for the rounded sides of the finished box.
See photo #4.

Step #5
You will use the tubes you made in step #4 to support the shape of your milk carton box. If you like a rounded box, tape the tube in the center of each of the "plus sign" sides.
See pho
 to #5.
If you like a flare at the top, tape the tube toward the top of each of the "plus sign" sides.
See phot
 o #6.
o #6.If you like a flare at the bottom, place the tube at the bottom of each of the "plus sign" sides.
See photo #7.

*If you like a flare at the top and the bottom, use a third milk carton to cut and roll four more tubes (to make a total of eight tubes, one at the top and bottom of each side). Pull in the petal side in the center with tape to make a feminine shaped box.
Pull a petal side down over each of the tube sides and secure the petals at the bottom of the box.
Step #6
Tape, tape, and tape some more.
Use plenty of tape to define whatever shape you choose to make.
When your shape is good and symmetrical on all sides, use tape to cover the openings at each corner. This will give support for the paper or clay you will use to cover the box.
S
 ee photo #8.
You are now finished making the structure for your Japanese box. Cover it and decorate it as you please to make a Japanese box with your own unique pattern. If you like lids, make a lid to match. I've made lids by covering craft foam or by using polymer clay. Please note, I covered the outside of the clay box with two layers of clay (about a 1/8 inch thick) curing in between the application of layers. I poked a few small holes for air to escape before curing the first layer.
If you choose to leave the inside unpapered, it can be used as a vase since milk cartons are made to hold liquid.
See photos # 9 and 10.


I hope you enjoyed learning to make Japanese boxes. I taught my mother to make these a few years before she passed away. She made the two papered boxes in photos #9 and 10. I treasure the memories we had making beautiful boxes together.
I appreciate my friends, Mayumi, Atsuko, and Manami, for sharing this Japanese craft with us. You helped us earn money to make a nice donation to the Red Cross for the victims of the earthquake, and you taught us skills that have enriched our own lives.
どうもありがとうございました!
These are fantastic! What a wonderful experience for your students.
ReplyDeleteThanks for the tutorial! I have been looking for how to make these for quite some time.
ReplyDeleteYou are so very welcome. I'd love to see your projects in progress and when finished too. Thanks for leaving a comment.
ReplyDelete