PROJECTS AND MORE
Hi my friends,
Things have been very quiet here on my blog since the start of the year. I've been focusing on a few projects all at once and just now have time to share with you.
To begin with I joined a group called
TADA 365 on Flickr.
Those in the group have made a commitment to focus on art jewelry and share either a finished creation or a work in progress each day this year.
The goals are to learn from one another, to encourage one another and to have pieces all ready for a show near the end of 2011.
This experience is already an extremely positive one for me. I'm meeting such a wonderful artists who are exploring a wide variety of media.
I marvel at the designs and drawings, the sculpting and forging, and on and on!
Please come see what's new each day on our Flickr group. PRAXIS PRACTICE
Yes, I'm still working toward adding Spanish to my teaching certification. I'm finishing up my intermediate level coursework on-line and preparing for another try at the Praxis exam this June. Artists from the Spanish-speaking world are included on the Spanish Praxis exam. I know that I'm really lacking in this area of study, so.... I decided to study Spanish art as my inspiration for my TADA 365 jewelry projects. By mixing my own interests into all the grammar and vocabulary I know I will be successful.
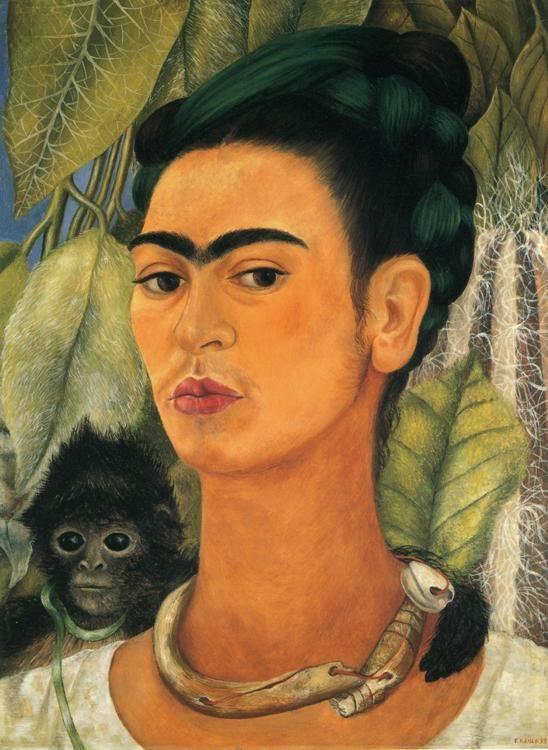
I started off my TADA à la Praxis by focusing on my favorite
Latina artist, Frieda Kahlo (later spelled Frida Kahlo). I spent a couple days researching her life; taking in her artwork.
The more I learn of her the more I want to know her.
She was heroically strong in the face of physical and emotional roadblocks that would have most of us crying "uncle" immediately.
Her determination along with her remarkable ways of looking at and interacting with her world make her artwork amazing on several different levels.
I know I will never tire of learning more.
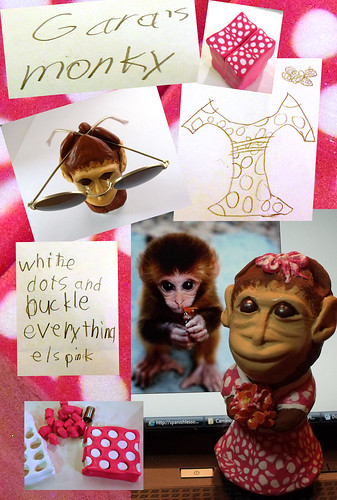
My first Kahlo-inspired piece is a bracelet inspired by the necklace worn in Kahlo's self portrait titled Self portrait with Monkey.
I used polymer clay shaped and sculpted to mimic bones. The holes in the pieces for stinging were made by running some buna cord into and out of the beads. I used a sort of running stitch idea instead of using a long tube of clay. I felt this technique helped me match the feel of the neckpiece in the painting and my "bone" pieces looked more natural.
After curing I painted and stained the pieces followed by carving and more staining. When I was happy with the surfaces I strung everything together with stretch cording and tiny shells. I added one of my favorite larger shells to give it a bit of simple beauty.
While this Kahlo-inspired bracelet of mine was a work in progress, I was thinking up a design idea for the first
ART BEAD SCENE challenge of 2011 .
It usually takes me two-thirds of the month before I can produce anything for these challenges, and this is too long to be considered for their "designer of the week" award.
I don't really mind though since I always learn something new in the process.
I rarely know much about the artwork or artist they pick.
Then there is the challenge of using a new color palette or texture or design- oh the possibilities!
This month featured the artwork of
Wayne Thiebaud, specifically his piece titled Brown River.
What a brilliantly colored piece!
ANOTHER COMBO DEAL
Well, I decided to combine ideas again. I had been dreaming of incorporating some anatomically plausible heart parts into my jewelry in honor of all those I'd been studying in the Kahlo paintings. I guess it could be said that Frieda literally wore her heart on her canvas.
I decided to use the color palette of the Thiebeaud painting from the ABS challenge with my textured heart design for the Kahlo's Heart piece I was working on in my imagination.
A NEW STAMP AND A NEW FRIENDSHIP

I wanted to use a stamp I made before Christmas using a technique I learned from a new friend from Spain. I met Almudena on Flickr, and she has already taught me so much. She loves to work with polymer clay, so we have that in common, and we share ideas and techniques. On top of this she is extremely patient and forgiving with my unwieldy use of her beautiful language, and for that I'm so very appreciative. I keep trying to write in Spanish and she keeps trying to understand what I mean. Almudena made a tutorial for using extruded clay to make a design using scrap clay. She used the design to make a texture stamp and shared her tutorial here. I loved her idea! What a great way to use some scrap clay and have a wonderful new tool.
Here is my stamp made with Almudena's technique.
I carved mine some as well. The best part of this is that Almudena and I are doing a stamp/mold exchange of our own. We are each waiting for little packages to arrive with each other's stamps. I will be so excited to receive Almudena's work, and it was so much fun to put mine in the mail to her too. I love looking at photos on my computer, but to hold someone's original artwork in my hands is even more of a thrill.
I started my work on the ABS challenge piece by defining my palette using BIG HUGE LABS and then started blending clay colors and conditioning. I layered my fairly thin sheets of clay with silver foil and alcohol inks with a bit of blue oil paint for good measure.
Then I pressed the layers into my mold and sliced off the tops flipping them over onto leftover orange and blue and yellow and gray clay. This is a surface technique named mokumegane. I love the surprises that come with this sort of technique, don't you?
My next procedure involved sculpting some shapes to match a simple sketch I'd drawn.
 After making molds of these shapes I shaped my focal beads using a skin of the mokumegane designed clay pieces over more scrap clay. I also distressed, antiqued and hilighted each focal bead.
From there it was a matter of putting everything together. I drilled holes in the "heart stones" and super glued in some wire findings made by shaping and hammering some permanently colored copper wire. I love to embellish by adding wooden and shell beads.
Finally I put this all together with some of my hand-woven wire made with the Viking knit method that my sister, Nancy, taught me last month. Here is a nice photo from the tutorial I linked to above:
PROJECTS TO COME
My next Kahlo project is still just a sketch for now, but I have too little time this weekend to make it a reality. My husband and I are making screen printed shirts for three organizations, along with supervising a science fair project for our son and an academic competition for my high-school Japanese students and on and on... so it is going to be a couple very hectic and fun weeks with very little sleep for the Palumbo family. Who knows, maybe I'll sneak a few jewelry art projects into the mix when nobody is noticing. Who needs sleep, right?